


In live streaming and video recording, the ability to zoom in and out is a real game-changer. Whether you're putting together a step-by-step guide, focusing on a specific area of the screen, or just want to add some pizzazz to your content, the Open Broadcaster Software (OBS) has got you covered.
This handy guide is all you need to get started with OBS zoom out and in. You'll be creating engaging and professional-looking videos with ease in no time!
Setting Up OBS for Zooming
Before we dive into the nitty-gritty of OBS zoom in, let's make sure that your setup is ready.
First things first, you'll need to have OBS installed on your computer. Once you've got that done, just follow these steps:
Step 1: Add a Source
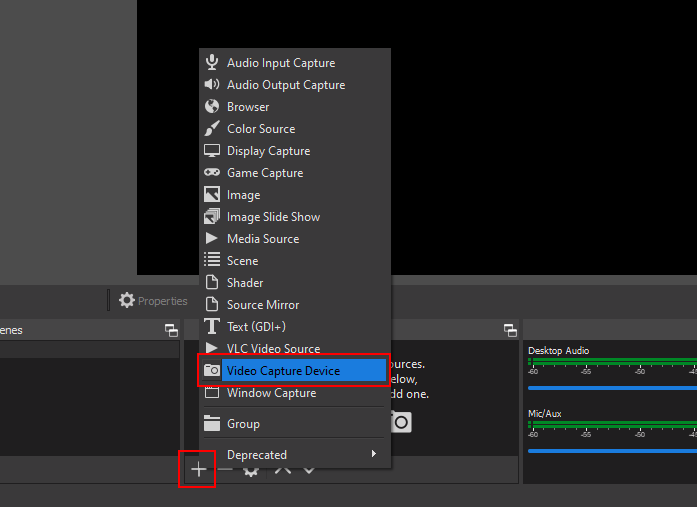
- Click on the "+" button in the "Sources" box located in the bottom-left corner of the OBS interface.
- From the list of available source types, select "Display Capture" or "Window Capture," depending on whether you want to capture your entire screen or a specific window.
- Name your source and click "OK."
Step 2: Resize and Position the Source
- Right-click on the newly added source in the "Sources" box.
- Select "Transform" > "Edit Transform..."
- In the "Transform" window, adjust the size and position of your source as desired.
- Click "Close" when you're done.
Just a heads up, if you’re dealing with a tight deadline or you’d simply prefer not to spend your time getting into the details of rather complex software, you might want to try out special screen recorder tools. With Screen Story, for example, you can take advantage of the automatic zoom feature in literally seconds.
But let’s get back to the Open Broadcaster Software…
OBS Zoom In and Out
Once your source is ready to go, it's time to learn how to zoom in and out. OBS has a bunch of different ways to get the job done, and each one has its own perks and use cases.
Method 1: Using the Transform Tool
The Transform Tool is a built-in feature in OBS that lets you zoom in and out on your source right in the preview window.
Step 1: Enable the Transform Tool
- Right-click on your source in the preview window.
- Select "Lock Preview" to ensure that your source remains visible while you make adjustments.
Step 2: OBS Zoom In On Screen and Out
- Once the Transform Tool is enabled, you'll see a red box surrounding your source in the preview window.
- To zoom in, click and drag one of the dots on the corners of the red box inwards. To zoom out, drag the dots outwards.
- To adjust the position of your zoomed source, click and drag inside the red box.
<iframe width="560" height="315" src="https://www.youtube.com/embed/d26TUeowe6I?si=vqaVf-AKXDQuZdZ7" title="YouTube video player" frameborder="0" allow="accelerometer; autoplay; clipboard-write; encrypted-media; gyroscope; picture-in-picture; web-share" referrerpolicy="strict-origin-when-cross-origin" allowfullscreen></iframe>
Method 2: Use the OBS Zoom and Follow Lua Script
While the Transform Tool is already built in, OBS lets you use third-party scripts and plugins to add extra features to the software. One example is the "OBS Zoom Effects & Mouse Follow" script, which lets you zoom in and out of your source material as you move your mouse cursor around.
Step 1: Install the Script
- Download the "OBS Zoom Effects & Mouse Follow" script from the official GitHub repository.
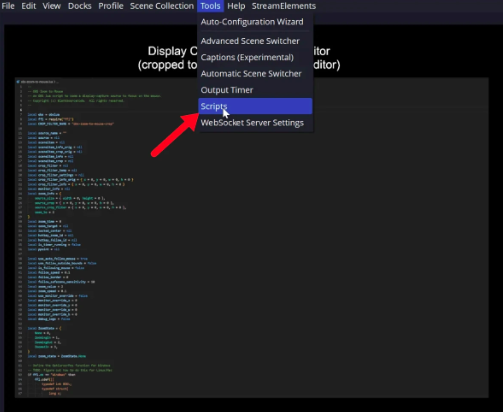
- In OBS, navigate to "Tools" > "Scripts."
- Click the "+" button and select the downloaded script file.
Step 2: Configure the Script
- Once the OBS zoom and follow Lua script is installed, right-click on it in the "Scripts" window and select "Properties."
- In the "Properties" window, you can configure various settings such as the zoom source, zoom factor, zoom speed, and whether you want the script to automatically follow your mouse cursor.
Step 3: Use the Script
- After configuring the script, you can activate it by clicking the "Start" button in the "Scripts" window.
- To zoom in and out, use the hotkeys you've set up or the zoom factor slider in the script's properties.
<iframe width="560" height="315" src="https://www.youtube.com/embed/YMvQMRLUhhM?si=9ihgb_jOp0fYY99P" title="YouTube video player" frameborder="0" allow="accelerometer; autoplay; clipboard-write; encrypted-media; gyroscope; picture-in-picture; web-share" referrerpolicy="strict-origin-when-cross-origin" allowfullscreen></iframe>
Tips and Best Practices
Zooming for Emphasis and Clarity
OBS zoom out and in feature is great for really bringing something to life on your screen, or making things easier to see in a tutorial or presentation. Use it when you need people to focus on a particular part of the screen or when you need to make a complex topic easier to understand.
Smooth Transitions
If you want to keep your viewers engaged, it’s best to avoid sudden changes in zoom level. Using the “Transition” settings in OBS can help you create a smoother and more polished transition. Alternatively, you could try using gradual zooming techniques, which can also help you achieve a more polished look.
Combining with Other OBS Features
OBS zoom in on screen feature is just one way to create engaging content in the software. You can really make an immersive and dynamic viewing experience by combining it with scene transitions, overlays, and audio mixing.
{{blog-ad}}
Streamline Your Screen Recording with Screen Story
While OBS is a great tool for live streaming and recording, it can get a bit overwhelming, especially for those new to video creation. If you want something more user-friendly and streamlined, try Screen Story – a Mac-specific screen recording tool.
Screen Story is here to help you create top-quality videos and screen recordings without any fuss. Its automatic zoom-in feature, smooth cursor movement, and customization options mean you can easily create stunning video demos, tutorials, and GIFs. You don't need any video editing skills, just start recording and the tool takes care of the rest.
Unlock the power of efficient video creation today and take your screen recordings to new heights with Screen Story.
Create stunning videos with Screen Story
Record your screen with audio and create stunning videos without editing skills. Screen Story applies the best design patterns to the video automatically.

.webp)

.webp)